0%

elefant使用心得(四)

看完前面三篇文章,相信大家对elefant都有一个比较初步的认识了。那么这节我们来看看怎样将自己的算法作为新组件添加到GUI中去,这才是我们最想要的。

加入自己的算法

如何加入自己的算法,官方文档里有简单的说明,但不完整,我是通过看一个NICTA的暑期学校视频(页面点进去一个老头讲的,有三段)而明白的。首先,我们需要找到Elefant的安装路径,为了找这个我费了半天劲,最后动用了终端的find命令,终于找到奔图下的路径为:
/usr/local/lib/python2.6/dist-packages/elefant
在这个目录下我们可以发现一个components子目录,其下有一个user目录,我们以后自己添加的组件(即py文件)就需要放在这里。注意到这里有一个叫example.py的文件,这就是官方给我们的例子了。

1
2
3
4
5
6
7
8
9
10
11
12
13
14
15
16
17
18
19
20
21
22
23
24
25
26
27
28
29
30
31
32
33
34
35
36
37
38
39
40
41
42
43
44
45
46
47
48
49
50
51
52
53
54
55
56
57
58
59
60
61
62
63
64
65
66
67
68
69
70
71
72
73
74
75
76
77
78
79
80
81
82
83
84
85
86
87
88
89
90
91
92
93
94
95
96
97
98
99
100
101
102
103
104
105
from elefant.framework.core.ports import IN_PORT, OUT_PORT
from elefant.framework.core.component import CComponent
from elefant.framework.core.customProperties import CCustomProperty

# CompA class
class CompA(CComponent):
__comp_name__ = "Component A"

# Define the properties for the component
# Property for matrix Rows
rows = CCustomProperty(int, 100, (10, 2000), "Number of rows")
# Property for number of columns for Matrix X
matXcols = CCustomProperty(int, 10, (1, 100), "Number of columns for matrix X")
# Property for number of columns for Matrix X
matYcols = CCustomProperty(int, 2, (1, 100), "Number of columns for matrix Y")

def __init__(self):
# Call init method of base class CComponent
CComponent.__init__(self)
# Add port as myPort1
myPort1 = self.AddPort("MatrixX", OUT_PORT)
# Add port as myPort2
myPort2 = self.AddPort("MatrixY", OUT_PORT)
# Define protocol for ports
self.matX = myPort1.AddProtocol("DenseMatrix")
self.matY = myPort2.AddProtocol("DenseMatrix")

def LoadData(self):
# Create numpy random array
import numpy as np
# Create random numpy matrix
x = np.random.sample((self.rows, self.matXcols))
# Create a random numpy matrix
y = np.random.sample((self.rows, self.matXcols))
# Set data to protocol of port
self.matX.SetData(x)
self.matY.SetData(y)

# CompB class
class CompB(CComponent):
__comp_name__ = "Component B"

def __init__(self):
# Call init method of base class CComponent
CComponent.__init__(self)
# Add port for Matrix A
A = self.AddPort("MatrixA", IN_PORT)
# Add port for Matrix B
B = self.AddPort("MatrixB", IN_PORT)
# Add output port for Matrix C = A x B
C = self.AddPort("MatrixC", OUT_PORT)
# Define protocol for ports
self.MatA = A.AddProtocol("DenseMatrix")
self.MatB = B.AddProtocol("DenseMatrix")
self.MatC = C.AddProtocol("DenseMatrix")

def DoProduct(self):
# Perform matrix multiplication
c = self.MatA.GetData() * self.MatB.GetData()
# Now set result Matrix C to output port
self.MatC.SetData(c)

# Class for display information
class Display(CComponent):
__comp_name__ = "Component A"

def __init__(self):
# Call init method of base class CComponent
CComponent.__init__(self)
# Add port as Buffer
port = self.AddPort("Buffer", IN_PORT)
self.buff = port.AddProtocol("DenseMatrix")

def myprint(self):
print self.buff.GetData()

from elefant.framework.core.ports import Connect

def main():

# Create components objects
a = CompA()
a.rows = 1000
a.matXCols = 20
a.matYCols = 3
b = CompB()
display = Display()
# Now connect these components
Connect(a, "MatrixX", b, "MatrixA", "DenseMatrix")
Connect(a, "MatrixY", b, "MatrixB", "DenseMatrix")
Connect(b, "MatrixC", display, "Buffer", "DenseMatrix")
# print the information about components
print "Comp A Information"
a.Show()
print "\nComp B Information"
b.Show()
print "\nDisplay Component"
display.Show()
# Now perfrom matrix product and display result
a.LoadData()
b.DoProduct()
display.myprint()

if __name__ == "__main__":
main()

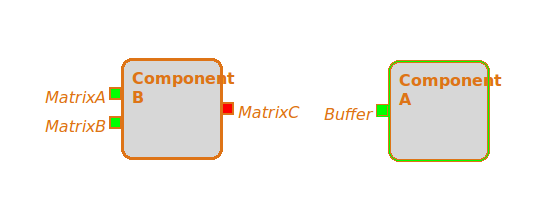
相信有了前面的基础,再看这段代码应该不算太烦吧。首当其冲的是把需要的类Import进来。我们看这个py文件声明了两个组件CompA和CompB,我们发现是以类的形式出现的。通过comp_name属性为组件定义名称,即在GUI里显示的名称,通过CCustomProperty()我们可以为组件定义属性,四个参数分别是:类型,默认值,大小范围,说明。在init方法中为组件添加端口及协议,我们必须牢记:### 端口之上有协议,协议之上绑定数据。组件A提供两个矩阵。组件B中定义了一个非私有的方法(Python中以双下划线开头的都是私有的):DoProduct(),这个方法计算两个矩阵的乘积。在mian()方法中进行测试,当然,你也可以写到别的py文件中去。可以看到,依然是老套路:实例化组件—->Connect端口—->调用各个组件的方法。

在这个文件夹下我们还能发现一个__init__.py的文件[注意该文件为只读的,改动时需要使用chmod命令改成可写],如果我们添加自定义的组件,这个文件起着至关重要的作用:我们必须将自定义组件的名称写进这个文件中去,打开文件,我们可以看到只能一行:

1
__GUI_PKG__ = ['example','MHKS','MatMHKS']

结果很简单,我们需要将自己添加的py文件的文件名添加到中括号内,上面本人已经添加了两个算法,即MHKS和MatMHKS [貌似example加不加都可以]。然后我们打开GUI,在算法菜单下的user algorithms子菜单项中,我们可以发现刚才example中的组件A和B了。

总结一下,添加自己的组件有两个要点:一,py文件放到指定文件夹中;二,改动__init__.py文件内容。有的时候我们发现新添加组件后GUI无法执行了,这时我们可以在终端里执行launchelefant.py命令打开GUI,如果无法启动会报错,一般的错误就是你新添加的组件的__inti__.py文件出错;有时还会碰到这样的情况,打开了GUI但打不开自己的组件,这是因为你的组件中__init__()方法出错,因为当你点击组件时会调用该组件的__init__()方法组件才能显示出来,无法显示时请检查你的__init__()方法方法。